
 After many
 years days of development, I’m glad to present the next feature update for TerraTool. Now it’s your turn to make some awesome maps for LiF:YO.
Custom Maps: Your Own
“How you do make the maps?”, “What software is used?” – I get these questions a lot and some people even got angry when I said “Photoshop and Notepad++”. Well it’s the truth – and now you can do it yourself very easily with just some basic graphic editing skills.
The only source of information the mapgenerator is using to generate LiF maps is a grayscale heightmap of the terrain. With this TerraTool update, you can upload own heightmaps, use them on your servers and even share them with the community.
To get an idea of how such heightmap is supposed to look like, here are the source heightmaps of Wishbone, Himalaya and Riverside:
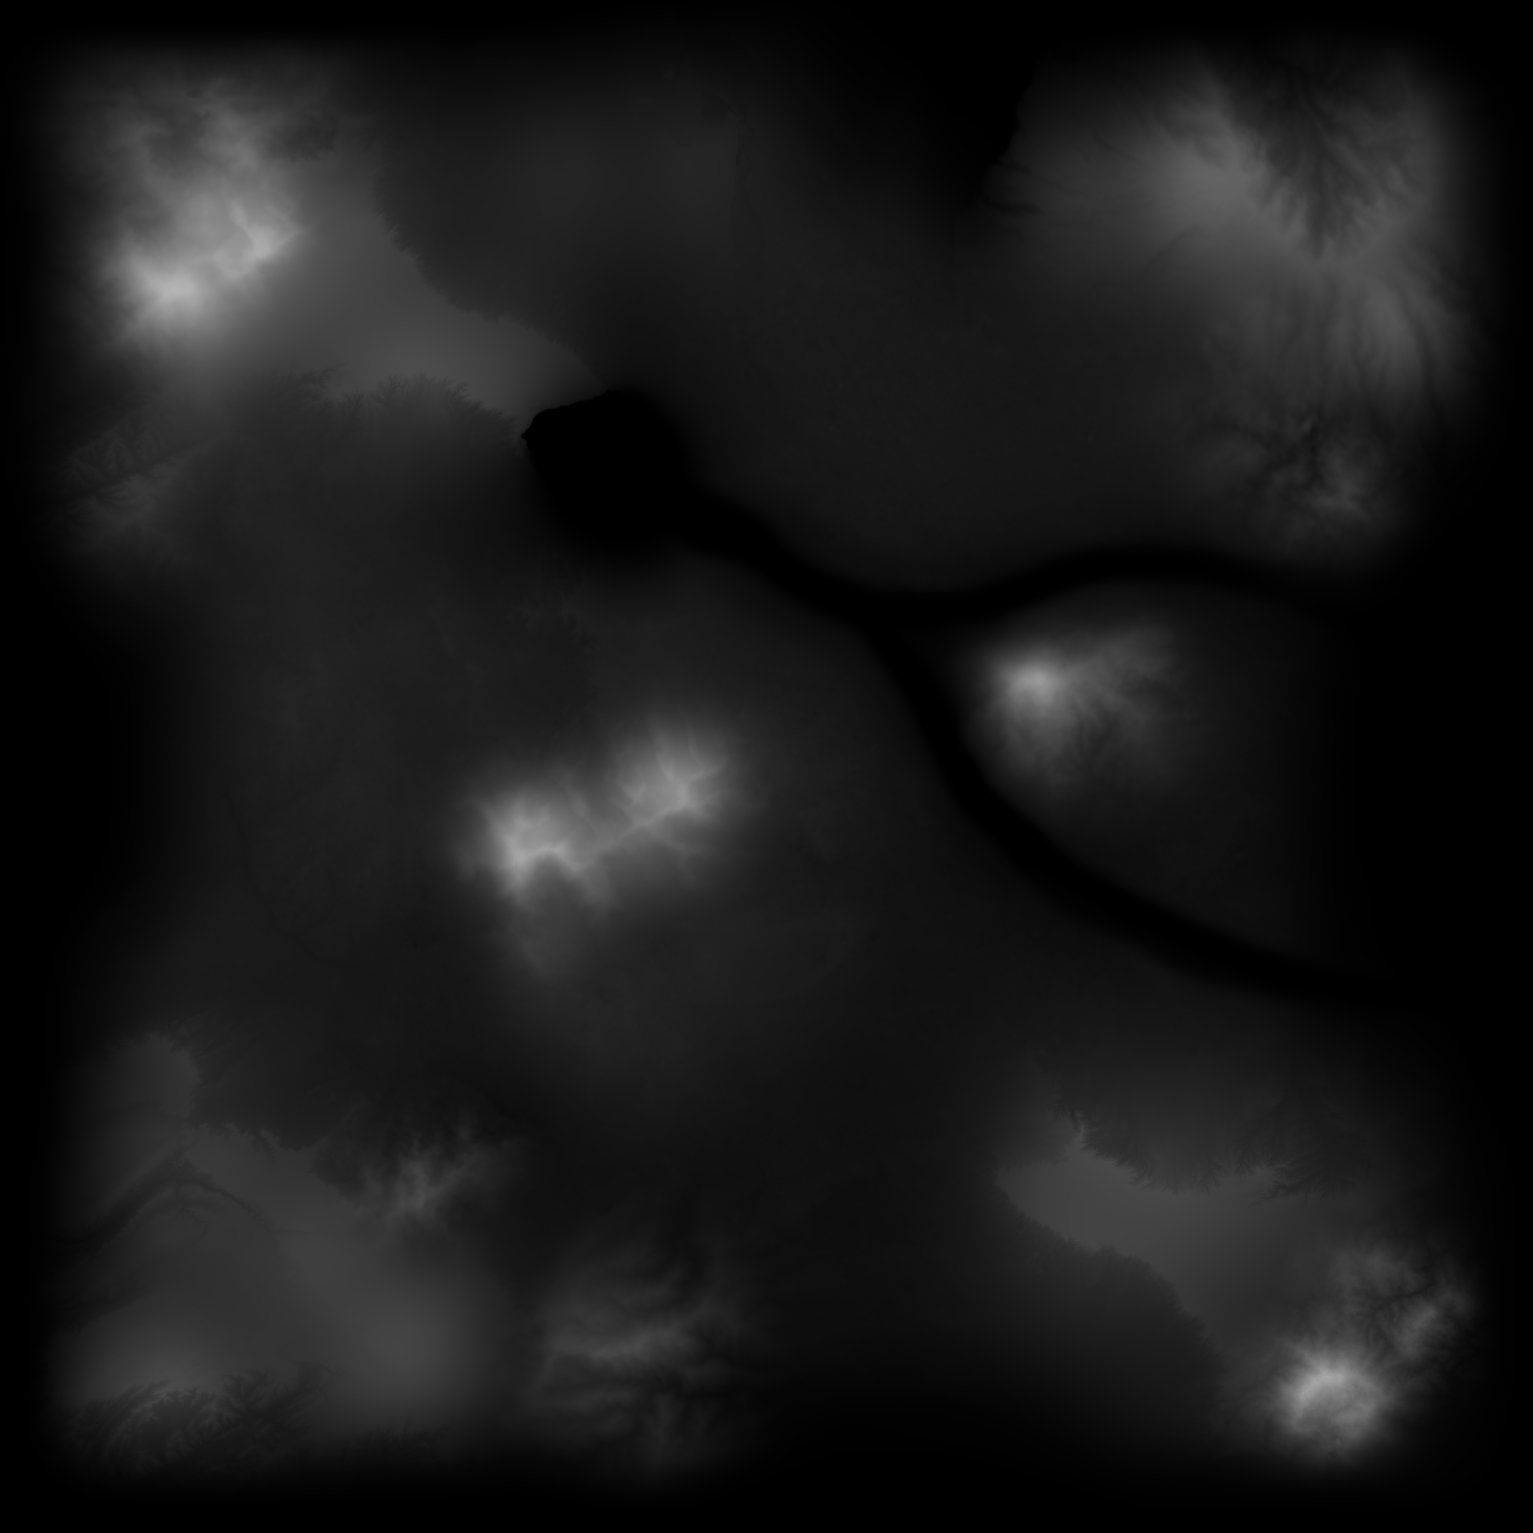
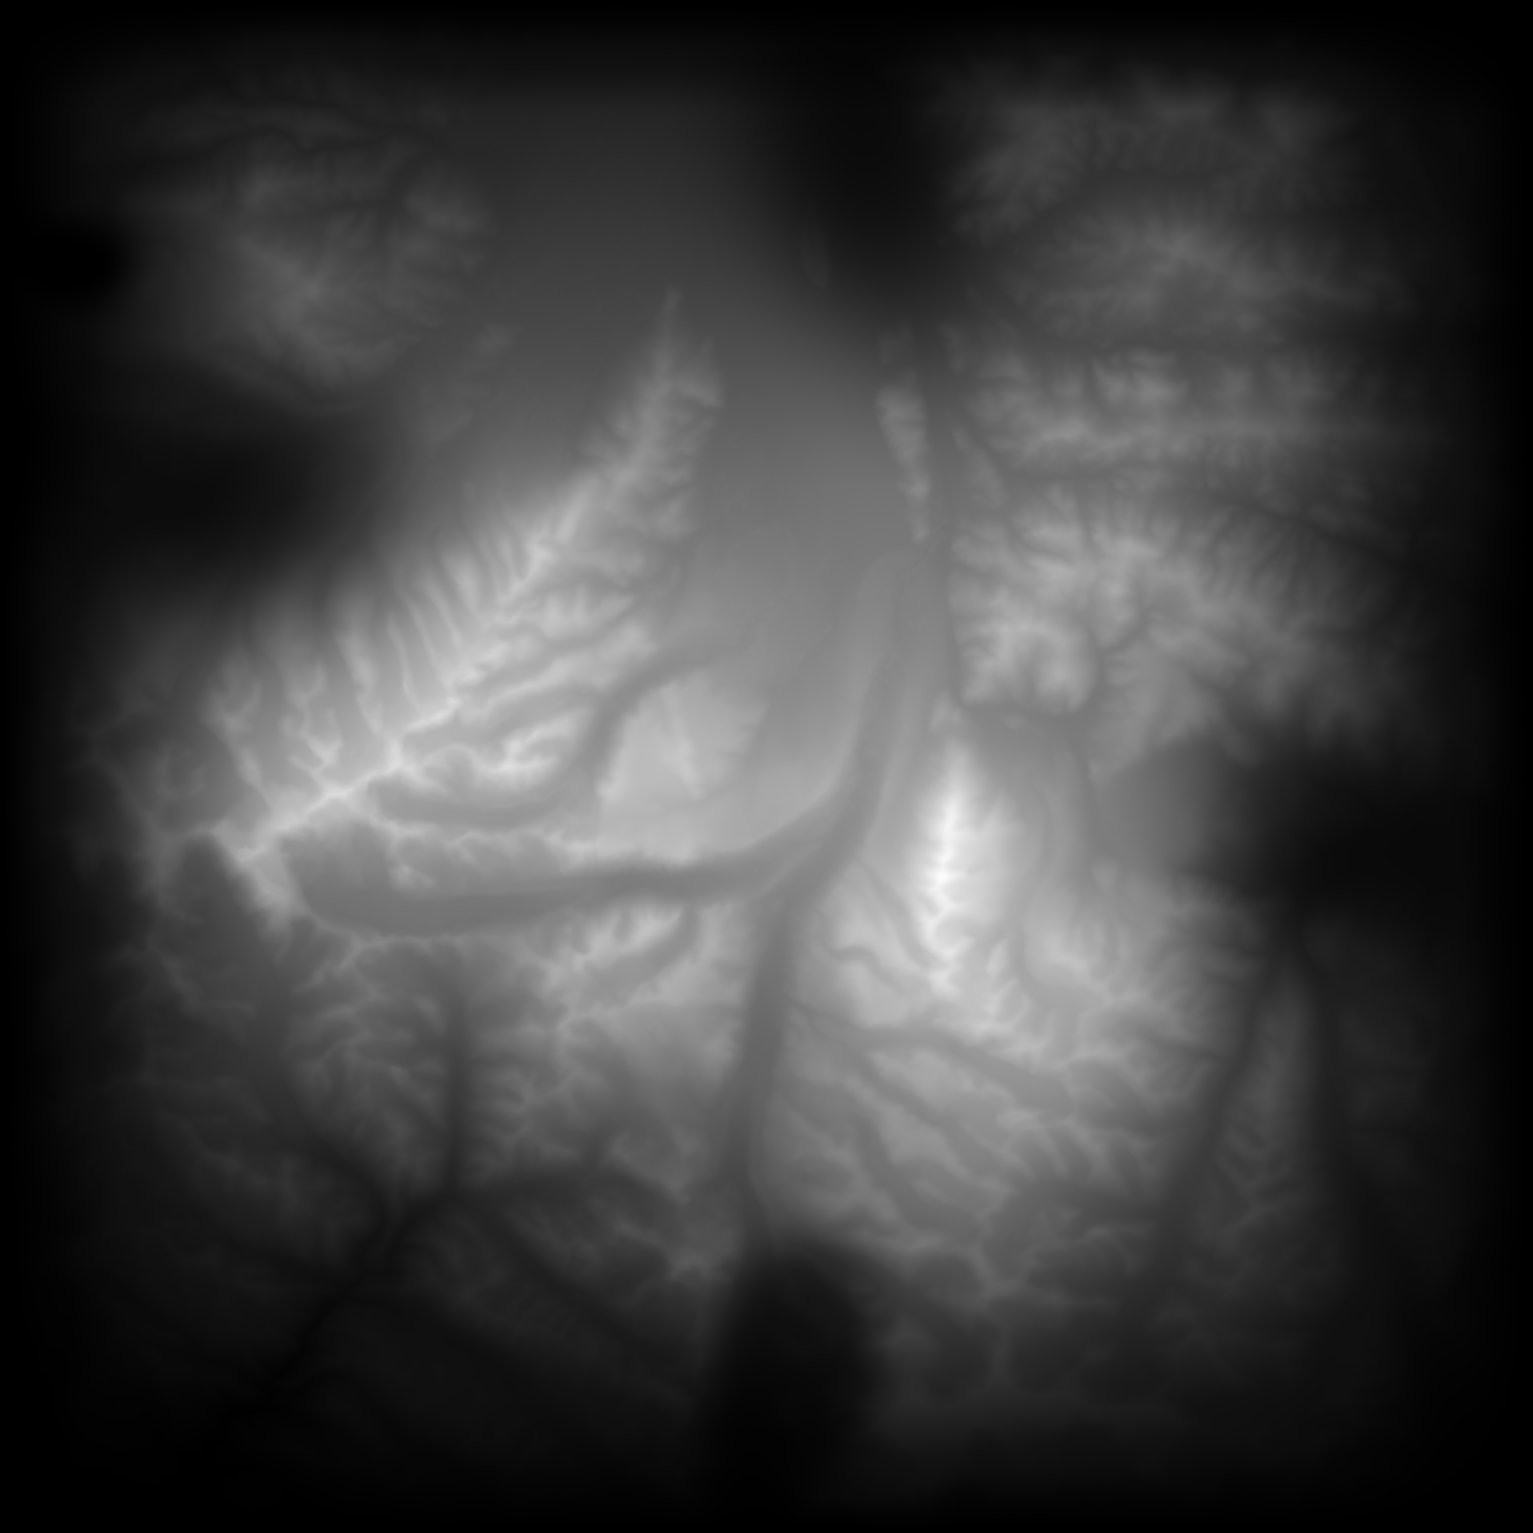
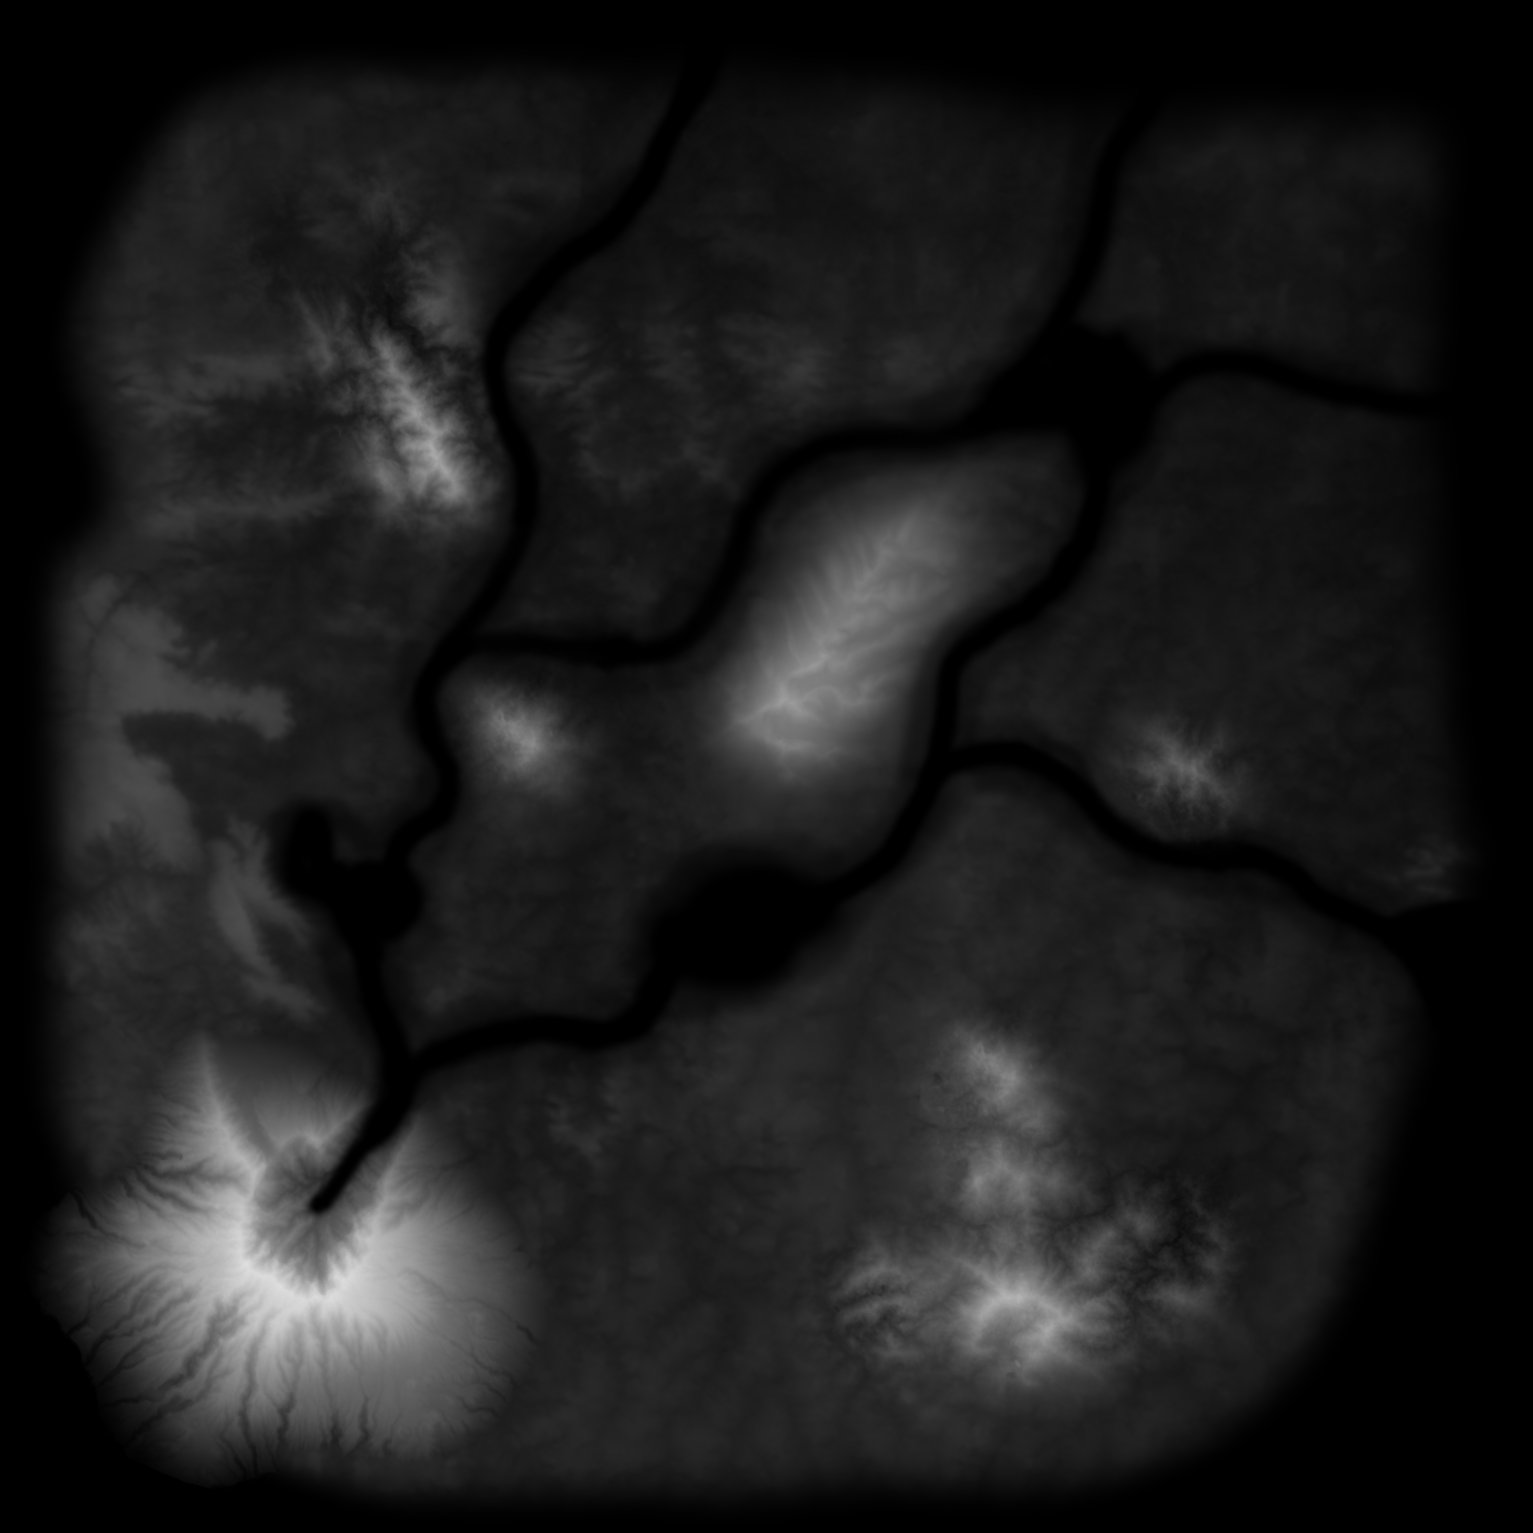
Each pixel in the heightmap defines the elevation of a game cell by its brightness. A light pixel means high elevated terrain. The scale moves between -9.0 meters for a pure black pixel and whatever you define as maximum altitude (125.0 – 375.0). This altitude will be tied to the lightest pixel on the heightmap, defining the upper end of the scale.
Where can you get proper terrain heightmaps? For the most part, I’ve used the terrain.party website along with the ‘Clone Stamp’ tool and some brushes in Photoshop. The Gran Canaria map is a pure, untouched export from their site. Other maps, like Riverside and Wishbone, are sort of a mixture of different terrains merged and edited with Photoshop.
Please note that your graphic editing software should support at least 16 bit per channel to get smooth terrain from the heightmap. Photoshop supports it natively. GIMP supports it since 2.9 beta.
File requirements and restrictions:
- PNG image format
- Maximum 8 MB filesize
- Image size of 1533 x 1533 pixel
- Minimum of 50 unique colors/shades
- Mimimum of 30% landmass after conversion
The Umbrella
 This is a new modification for the original map. This time, we’re adding a penisula to the north-western corner of the map and have a land bridge connecting it to the main island.
The overlapping area is very small, but anyway: Make sure there are no buildings/objects at the coastline before applying this one.
Besides that, there is a number of small changes and enhancements. The max. altitude for custom maps was extended by 25 meters in each direction (now 125.0 – 375.0). The statistics page has an additional pie chart to show trending maps based on data of last 7 days. The maximum daily jobs capacity was increased. As always, all detail can be found in the changelog.
Nice Nyuton, very nice indeed!
Custom Maps: Your Own
I have made some Maps, all maps minecraft style not smooth.
I have the Heightmap smoothed with Gausian in Gimp.
The File is Smooth the Server is minecraft like.
What do I have to do to make the transitions look smooth?
You want to make sure your heightmap image has a color depth of at least 16 bit. 8 Bit images are limited to a maximum of 256 unique shades of gray, so there will be max 256 different altitudes on the map. This will look very blocky indeed.
It can be checked in file properties > details.
http://nyuton.net/wp-content/uploads/2017/05/colordepth.jpg
I’m sure GIMP has an option to increase bit depth somewhere.
The uploaded file has 24bit
I just checked the file uploaded (I assume it’s salier.andabe.de2)
Yes it is 24 bit but it’s no grayscale PNG. It’s a color mode (RGB) PNG image. So you have 24 bit – 8 bit for each color channel. This still leaves you with 256 gray shades.
Switch mode to grayscale in GIMP like shown here:
https://docs.gimp.org/en/gimp-tutorial-quickie-change-mode.html
Probably will have to do some edits again afterwards to actually see a change.
My Gimp 2.8 can not store 16 bit it no matter what i make it come 8 bit out.
ImageJ can 16bit the saved image is displayed to me in MS Windows Preview black, only ImageJ opens it correctly. If I load it up here in preview it looks good. I just make the map and am curious how it will be.
sorry for my bad English.
Unfortunately still it does not form still areas which all have the same height on a shallow rise.
I have the file on 16bit gray changed and still smoothed 10x.
But it’s still not really nice.
Your files all have in gray only 8bit and are smooth.
I do not understand what I’m doing wrong.
i dont now what to do.
Your exampels jpg 8bit ok.
i cant use 16bit Photoshop elements 8bit Grayscale.
Gimp 8bit Grayscale.
ImageJ 16bit but the result is the same.
I hate This realy.
The whole would be so awesome if it would work.
8 bit grayscale will always look blocky. The images in my blogpost above aren’t the original files. They were converted to JPG to decrease filesize. Feel free to upload them on TerraTool and you’ll see that the terrain will look stupid as well. I didn’t want to post the original ones as they are 3 MB each, which is not suitable for websites… so I had to convert them.
Here’s original: http://nyuton.net/wp-content/uploads/2017/05/2_heightmap.png
Simply converting an image from 8 to 16 bit won’t do much either, as it doesn’t change anything in the image. It just allows for using more fine grained color steps in future edits. Should probably start over from scratch cleanly with a 16 bit grayscale and never ever save it in lower quality. I see that GIMP 2.8 not being able to save 16 bit grayscales is a huge problem, so I’ll remove it from the recommendations list in the post. Thanks for pointing that out… I didn’t know.
Or maybe you can find a 2.9 beta version of GIMP, which supports 16 bit per channel.
Adobe has CS2 free Keys an Download!
That was the solution for me File Opened convert 16bit Blur 1,0 Save the File.
So it’s perfect!
Thank you again!
And please continue your work, the tools are a real enrichment for the game!
For some reason, i am using the user created map RiosN and the map goes minecraft mode, any suggestions as to how to fix that issue?
Ich denke du bist Deutscher da kann ich helfen. ^^
Du brauchst seine Highlightmap, die ist in 8Bit Graustufen gespeichert. Das reicht nicht, man benötigt eine 16Bit Graustufendatei. Diese hat geglättet wesentlich mehr Höhenangaben für die Maperstellung und erzeugt damit wesentlich schönere Karten. Musste das hier auch erst lernen.
Unfortunately, my friend i am not German :/ and i am not trying to create a map of my own. I am instead using a user created map, but for some reason every time i import the map on my server, it turns out Minecraft Style. Thanks for trying to help me MacGuyver. Nyuton, any Tips on how to fix this?
It’s what MacGuyver says. Low quality heightmap results in low quality (blocky) terrain. So the map author needs to fix it.
The Owner of this Map must fix it.
Since the user has missed the quality control of the map,
it would be better to delete this from the public.
Nice work but I have a doubt when I get the map it generates 4 maps which I should use. Another question I use CS6 but the image is 32 bits, is there any problem with the image being more than 16?
* 4 maps Which one should I use?
I used Unity and Photoshop to make the map, and successfully generated the SQL file, and then applied to my server. This tool is great.
But how can i make my map public?
I click on the publication, the page shows “This map is not qualified for sharing. See the mapgenerator logfile for details.”
I am sorry for my bad English
There are land tiles hitting the map borders?What does that mean?
It means exactly what it says. You have land surface cells on the borders of your map. There are a few restrictions to what maps can be published, described here: http://nyuton.net/terratool-update-1-4-0/
Has been resolved, thank you for your answer; TwoRiver is the first picture I made; the other I would like to ask, what can be the sand and water placed in high altitude areas, or the game engine does not allow to do so? Haha
Is it ok to use the height maps that you showed at the beginning of your post?